I replaced the old electronics and light bulbs by LED’s. In addition I placed a yellow warning light on the roof top of the locomotive, that is planned to be flashing. For the power supply to the track cleaning waggon I also had to add a power plug at the end. In the front section a insulating screw joint has been mounted to connect the BlueHorse board from BlueRailTrains. I had to construct a little rack to put the BlueHorse board above the screw joints.
All posts by AlexG
Battery Power
As you may remember, I needed some more weight for the track cleaning waggon. I already mentioned in my previous post, that I decided to make the cleaning train battery powered. Finally the parts and pieces arrived. So mounted the two rechargeable battery packs on both ends of the waggon. In addition I added a main switch, a signal light and a fuse in to one of the boxes before wiring it all to the plug at the waggons wall.
I have now 12 volts with 1900mAh available for the battery powered locomotive, which recontruction is coming up….
new diesel locomotive
Please welcome the new “family member” in my garden railway group. ![]()
I shot this used, little diesel locomotive on ebay. The idea is to give the track cleaning wagon a propulsion. If the tracks have to get cleaned, the locomotive usualy has issues to get the supply power from the tracks. So it needs to have a power supply independent from the tracks. The only possibility is to get this locomotive battery powered.
As the track cleaning waggon needs additional weight to press it to the rails, the plan is to place rechargeable batteries in to the waggon and connect it to the locomotive. I also plan to control the locomotive also with my smartphone using the BlueHorse board from BlueRailTrains, as I already do it with the LGB Stainz and PIKO VT98.
view to the sea
View over the dunes to the sea at a sunny sommer day.

Building a cleaning waggon
Rails get dirty by time – especially if they are outdoors all year long. It doesnt matter, if you are running dead rail (battery powered), but just in case you power your locolotives by using the rails, they have to get cleaned very often. Otherwise you will contact issues very soon. The LGB clean engine is way too expensive in my opinion. So what’s the solution?
Well – I shot a used Playmobil waggon on ebay for 30€, went to the local hardware store and bought a spone and a polishing felt for another few Euros. I used the sponge as plume between the cleaning pad and the waggon. It is mounted to the waggon by using two screws. The felt is fixed by four small cable strabs and now can exchanged pretty easy. The only thing I had to add are little weights into the waggon, that the felt get little pressure to the rails.
Stuff aboard!
christmas train in action
Stainz wiring plan
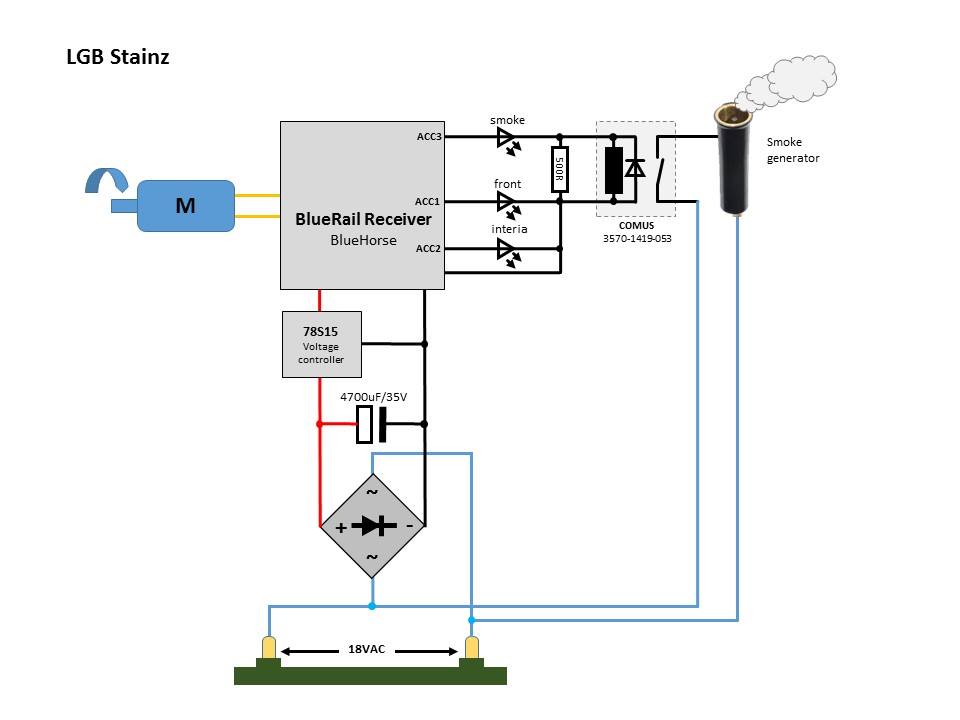
To finalize the story of the LGB Stainz steam engine: the electrical wiring plan.

LGB Stainz update….
I build in a DC relais and connected it to the BlueHorse Board. I also replaced the original LGB smoke generator. Not it is possible to switch the new smoke generator on/off by using the BlueRail app over BlueTooth and the personal smartphone.
To avoid killing the smoke generator by running it dry, I also added a 3mm LED to be able to see, if the smoke generator is turned on.
Enjoy some of the impressions….
VT98 done with interia lights
The PIKO VT98 is changed to the “BlueHorse” board. For switching the front and rear lights – and in addition the interia lights – it is not possible to connect the LED’s directly. I connected the ACC outputs with a reed relay instead. One relay for each channel. The “BlueHorse” board is that intelligent, that it is switching between white front lights and red rear lights automatically depending to the drive direction. The interia lights are independent and can switched on/off seperatly.
As you may see in the pictures, it was a lot of tiny soldering stuff – but it is working in perfection.